Brooke Turns ONE!

It’s hard to believe that one whole year ago, Brooke came into our lives!  Wow, people are not kidding when they say “don’t blink” when it comes to having children.  Looking back on this past year, I just can’t believe how much has changed…but in the most amazing way.

Rewind two years ago…browsing Pinterest and seeing all the amazing ways to decorate and celebrate a little girls birthday.  Pom Poms and pink pink pink!  I have always wanted to throw a little girl party because, I am pretty girly and it just seemed like the fun thing to do.  Brooke’s first birthday party was my chance to make this dream come true.  Sigh…so perfect and dreamy and fun.

Reality…Brooke is a bundle of mobile…crawling at the speed of light and transitioning to ONE nap a day.  AND, being pregnant with baby #2 and super sick…yeah, throwing a party seemed like an unusually large and difficult task.  Then my doctor prescribed my Diclegis, aka amazing morning sickness cure and the ability to feel normal *lights beaming from Heaven and angels singing* THANK GOD!  Brooke’s birthday is actually July 27 but we pushed her party back to August 16 to give this mommy a chance to accomplish that fun pinterest party she has always dreamed of.  So off to the Goodwill and thrift stores I went!

Brooke’s party was a month in the making…potentially longer.  I made a lot of my decorations and collected inexpensive alternatives to my inspiration.  Here is the picture that captured my eye for my little girl’s first birthday party.
Screen Shot 2014-08-17 at 8.20.49 PM
Here is my version!
DSC_1458
DSC_1460
Burlap is very inexpensive at Walmart, topping that charts at a whole $2 and some change per yard.  Score…those are the kinds of deals I get excited about.  The pink linens and banner in the background came from Goodwill that I picked up over time.  I purchased the wooden “B” on discount from a local artist and printed a ton of pictures that I placed in various frames found on the 70-80% off rack at Kohl’s.  To save money, I made my own cupcakes and smash cake…with a little help from Pinterest.
DSC_1462
I picked up a vintage wood high chair from the Goodwill for $25 and distressed it myself.  Always a cheaper option than purchasing from a local designer.  For information on how to distress furniture, check out my past blog posts for step by step instructions (I’m obsessed).  The sweet milestone poster above the high chair was designed on Etsy and printed through Shutterfly.  Then, I found the white frame on super discount at AC Moore.  Beware Mama’s…these posters are super cute and all but they are NOT cheap.  Unfortunately, once I started down this path, I had to complete or it was a total waste of money.  I wish I had some thrifty advice for this cute little detail but be prepared that it’s more of a splurge.
DSC_1463
I also decorated our fireplace mantle with more pictures of Brooke.
DSC_1466
Since Brooke is a baby…well, I guess google now considers her a toddler, I wanted to create an environment for her little friends to play safely and have tons of fun.  I totally stole this idea from another mama on Facebook because ladies and gentleman…this is brilliant!  A 10ft blow up pool, purchased at Target for $29, filled with toys toys toys galore and balls!  This was a hit with all the kiddos and best of all…the kiddos were contained in a bumper proof environment!  Win for kids and Win for adults!
DSC_1468
Lastly, the food!  I would love to take credit for all the yummy food and call myself Mrs. Martha Stewart Jr. but folks, let’s get real.  I have a one year old!  Enough said!  Lowe’s foods caters these beautifully delicious trays for less money than you can make the food.  Win-Win!  No cooking for this mama and a bargain!  Best kept secret!  My mother in law was also extremely generous and made 18 lbs of homemade country fried chicken that was a total hit!  18 lbs of chicken for an 18 lb little girl!
DSC_1472 DSC_1471 DSC_1470
DSC_1474

Distressed Obsessed

I mentioned in my last post that Goodwill is a great place to find lots of Oldies but Goodies, especially for those late night De-Stressing projects.  I’ve been spending a ton of time at the Goodwill these last few months and seem to be hitting the jackpot lately.  Another exciting find – an entryway piece.  Here is my bundle of amazingness that I scored for $130.  Drum roll please….

photo 1

Ta-DA!

Oh, come on…THAT is the piece you fell for at the Goodwill?  That is pretty ugly.  I’m fairly certain that piece would go great with a puke orange shag carpet and a pair of bell-bottom jeans!  Yes, yes, I know but oh the potential.  Again, when looking for furniture to distress, the absolute best pieces have lots of grooves and details.  That little orbital sander LOVES chipping paint off every little detailed crevice.

This piece was real wood which made my job so much easier.  No priming needed and very minimal sanding.  I used the same recipe for chalk paint as my previous distressing project.  Here is the final product.

photo 2 photo 3
DSC_1360

The mirror included with the furniture seemed too blah to me.  BORING…plus, I have been working really hard to conquer my fear of color.  For some reason, my eye always goes to the most bland and neutral earth tones and that is what I end up decorating my house with.  I still love neutrals but a pinch of turquoise in the ceiling tiles I found online seemed to be the perfect compromise.  This project called for two tiles which I found on Amazon for a whopping $30 total.  Although, when my tiles arrived at my doorstep, they were turquoise.  Like super turquoise.  Like BAM all you see is turquoise.  No problem…nothing a little spray paint wouldn’t fix.  I sprayed the tiles with left over oil rubbed bronze paint and sanded the details so that the turquoise showed through.  I accomplished my color goal but also still stayed with my earthy taste.  I’m in love.  The wrought iron basket on the bottom shelf of my new and improved piece is also from the goodwill…$5.


Wine Down and De-Stress

Oh hey there blog…nice to see you again.  Finding time to jot down a few thoughts or, perhaps, completing a project, are few and far between these days.  This life as a mom, a new mom, is the best thing that has ever happened to me (other than the day I married my amazing husband of coarse), but, leaves just scraps of time for myself.  If there is anything I have learned these last 10 months as a new mom, it is the importance of making time for yourself.  A warm bath with a glass of your favorite cabernet, an ice cold beer and a large slice of pizza (or a whole large pizza for that matter) or simply a quiet 30 minute drive ALONE with no baby.  Whatever that looks like for you girl, DO IT.  It is important to have a “mommy-vacation,” away from your husband and child…time that is all about YOU.  For me?  It’s finding time to do my projects.  I call it my “wine down and de-stress” time.  This usually happens at night, after the baby goes to bed, in the garage with loud inappropriate music (Miley…don’t judge), a nice glass of red or an ice cold beer in hand, something ugly and a paint brush.

This is the best time of the year to stop into the Goodwill.  Rich people are doing their yearly “Spring Cleaning” and giving amazing things to the Goodwill.  Or, ugly things that have serious potential.  Take this china cabinet for example.  It’s not horribly ugly, just…well…it’s pretty ugly.  I loved the detail on the doors.  “Hunny Dearest…I’m ganna need your assistance with driving 30 miles (one way) with the trailer…load the china cabinet I just bought for $99…on your day off…OH, and I am going to need the garage for about a month…THANKS!”  This guy must love me in spite of some of the silly things I ask him to do.

IMG_5632

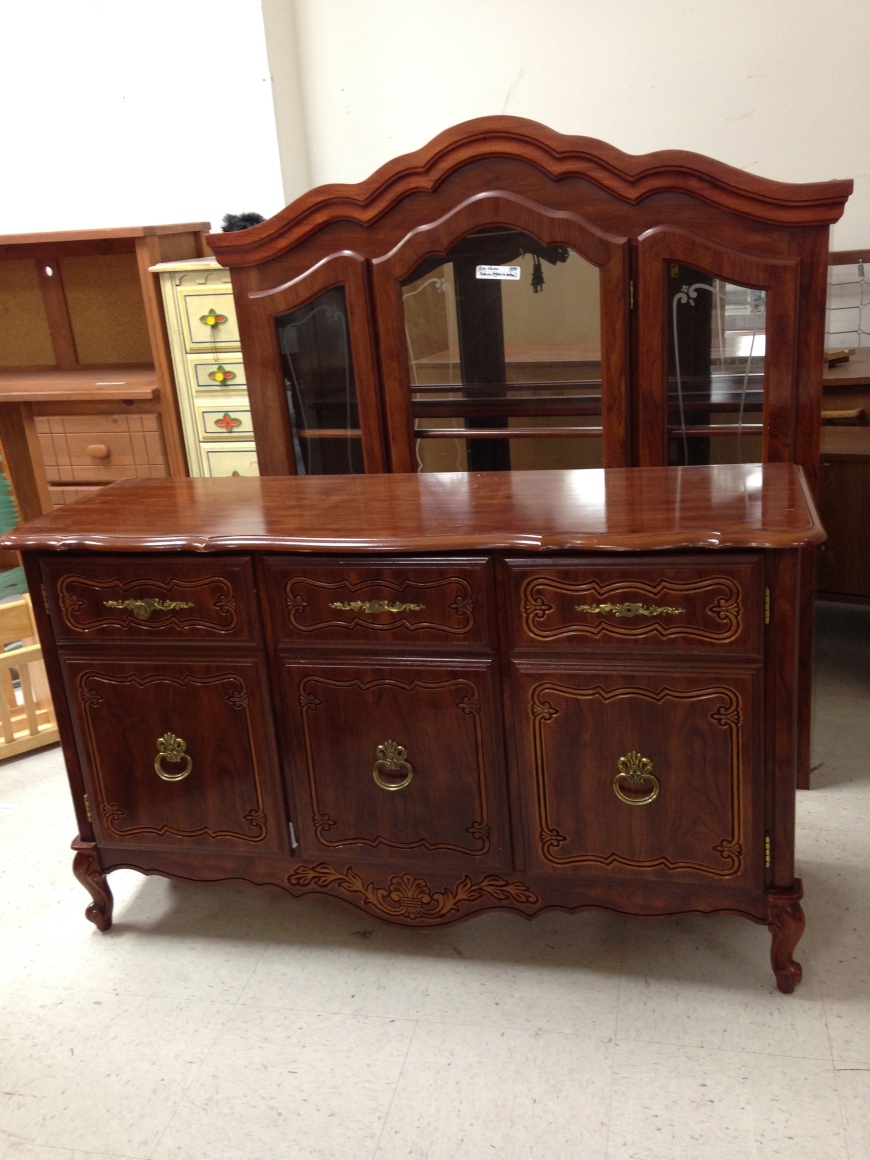
First things first…this china cabinet is pressed wood.  No problemo!  Nothing a little primer wont fix.  I removed all the hardware, glass and the back of the top piece and lightly sanded.  The orbital hand sanders work the best for projects like these.  It is important to lightly sand furniture you are restoring so that the paint has a grip to stick to.  Next, the priming.  Super easy, I used the spray paint kind.

IMG_5709 IMG_5708

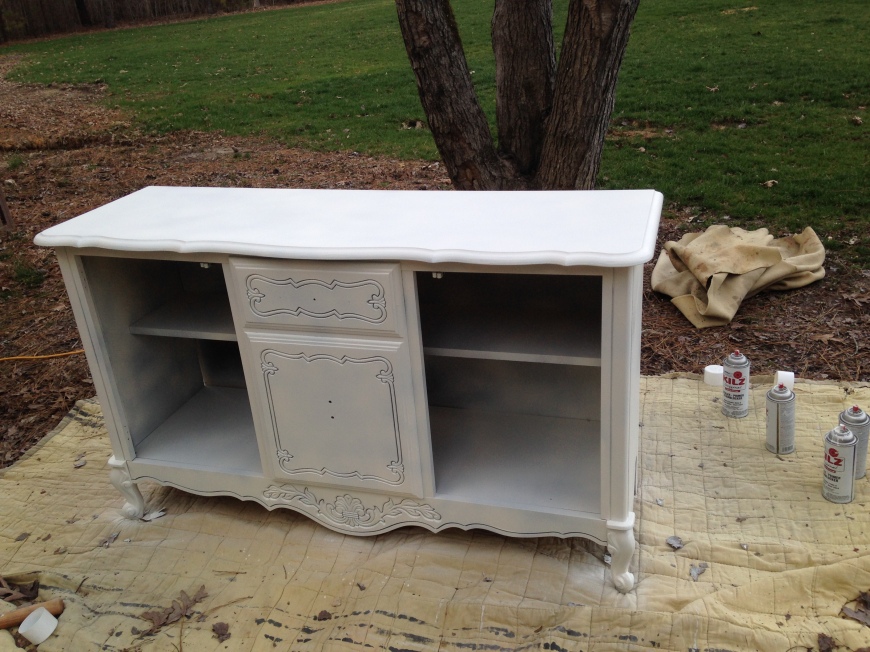
Once you are all primed, it’s time to paint.  I found that the small paint rollers worked best for this project.  Of course, you use a paint brush as well for the fine details in the cabinet.  Annie Sloan’s chalk paint…one word for ya…DON’T!  Its like $50 for a small can.  No offense to those that love this stuff, but its is so much cheaper and WAY easier to make your own AND you can use any color paint you want.  Annie Sloan only offers a few colors to choose from.  Here is the recipe I used:

Brittany’s Redneck Chalk Paint Recipe
  • 1/2 cup of warm water
  • 1/2 cup of Plaster of Paris (can be found at any hardware store)
  • 1 cup of any color and finish of paint you want
mix well…and paint.  Yes folks, it’s that easy.  A monkey could make this stuff…heck, my 10 month old could make this stuff!

Two coats of paint is all I did.  Let dry over night.  Now the fun part…the sanding.  Turn that handy dandy orbital sander on and start lightly sanding all edges and details.  Anyone can do this step as well.  It really does’t matter if you go hog wild or stay conservative with the sanding.  It looks good either way.  The end goal is to make this project look ridiculously old.

For my china cabinet, I removed the back of the top piece and added a piece of waynes coating that I stained a darker walnut color.  I liked the idea of contrast.  Also, instead of adding the original glass back to the top piece, I added chicken wire that I spay painted oil rubbed bronze.  BOOM – a china cabinet makeover that is much more contemporary.
IMG_5836 IMG_5848
DSC_1143 DSC_1145
My matching china pattern also came from the Goodwill in under $20.

The Office Space aka “Man Cave”

Life has been super busy with a new baby.  Free time for blogging?  …yeah right.  I am lucky if I can get dinner on the table and the house remotely presentable these days.  Life as we know it has changed, but this new life?  I couldn’t ask for a better one.

Ten weeks ago, I was a large balloon, ready to pop!  Like seriously, not even kidding, WHOA preggo.  The last month of my pregnancy, I set a goal: “to complete the hubby’s office, aka man cave.”  Because, let’s be honest, when I pop this baby out, the house will be put on hold for a long time.  Plus, the hubs spends most days in that office as his job requires him to work from home.  I spent that last year shopping for baby baby baby and nursery nursery nursery…I wanted to make his space special and soothing because homeslice basically lives up there.  Well, that was my goal and I got 95% of the way done and BAM, my water broke.  Funny story actually, I was installing his inspirational quote sticker and this is when Miss Brooke decided to make her grand entrance, four days early!  For more our daughter’s birth story, check out my last post here.  I am happy to say, the office space is complete and SUPER manly, I must say.

A little background on this room.  Imagine white walls and linoleum floors.  Wait…linoleum floors in an upstairs office space?  Hmmmm…I’ll let your creative mind draw a conclusion for the “purpose” of this room!  Obviously, this was Dexter’s kill room as the floors were easy cleanup.  Or, perhaps a room to keep animals but that is a super boring explanation.  Anyways…here is the newly decorated and freshly painted office space, otherwise know as the hub’s “Man Cave.”

Yes, that is a ginormous safe…Merica!

DSC_0075

DSC_0081

DSC_0078

DSC_0077 DSC_0076

I love this wall!  This past summer, my hubby celebrated his first Father’s Day since we had a little one on the way.  My In Laws came up with the coolest idea: Frame pictures of Chad from “bring your kid to work day.”  At the time, hub’s dad worked for IBM (and still does).  Hubs was about eight years old in this picture.  The irony of these pics is that Chad is now a daddy and working for IBM.  So cool and so special!  His favorite inspirational quote and special memories framed below will make him smile every time he looks at this wall. 🙂

DSC_0079

A Baby Story: Brooke’s Birth

Two weeks ago, our life changed forever.  It changed in the most amazing way and I don’t have the right words to describe the love and the absolute joy that has filled our hearts.  Our lives will never be the same…but in the most amazing way!

I lost my mucus plug on a Thursday afternoon.  I was so excited, thinking that Brooke could make her grand entrance anytime.  I could barely sleep that night because I was sure I would go into labor at any minute…wishful thinking!!  Pregnancy can be challenging and you get so anxious and impatient towards the end as every little thing you would do in a normal day becomes so very challenging.  You can no longer bend over like a normal human being.  Shaving your legs is impossible and you spend countless obsessive hours in your baby’s nursery dreaming of the day you can place her in the crib.  Come on…get this baby out of me is the first thing that comes out of your mouth anytime someone notices you are preggo and about to pop.

Friday morning came and I was still not in labor.  My MIL texted and asked if I would like to hang out, go out to breakfast and shop for the day.  I spent the day having lots of fun and shopping with my MIL.  The hubs went into town for work during the day and we figured that we would have date night later and grab a bite to eat since the time was limited for things like that.  I got home about 3:30 pm and started working in Chad’s office!  His office is almost complete and then I can blog about it – yay!  After several trips to the bathroom and the constant feeling of peeing my pants, I called my Dr. claiming that my water could have broken.  The kind nurse instructed me to go ahead to L&D to get checked out just in case I had a slow leak of amniotic fluid.

Feeling absolutely ridiculous, I called the hubs and asked him to meet me in L&D as the Dr. wanted to check me out just in case I was leaking amniotic fluid.  I had ZERO contractions…there was no way I am in labor.  But, better safe than sorry.

Hubs and I checked into the Hospital cracking up at the thought of what if the baby came that night.  I am sure the lady that checked us in thought we were absolutely ridiculous!  This chick is obviously not in labor.  We were assigned a room and I was asked to change into a labor gown to get checked out.  As I changed into my labor gown, my water broke…all over the floor!  The hubs looks as me and was like “ummm babes, pretty sure that was your water.”  I was in total denial!  “No babes, I have no contractions this is not going to happen tonight.”  Of course he looked at me like I was a crazy person!  The nurse came into the room, checked me out and sure enough, my water had broken and we were not going home that night.

We are having a baby…OMG we are having a baby!!

The parentals came to the hospital to witness the arrival of our baby girl!  Only problem…I STILL had no contractions.  I was told that if I do not contract on my own in 3-4 hours, that I would need to be induced.  PITOCIN…OMG I was so scared!  All the pitocin horror stories were popping into my brain and all of a sudden, down the hall, the only other girl in labor started screaming.  I clinched my legs together and looked at my family with lots of fear.  OMG I was going to die!

10PM I was strapped up to a machine and pitocin started dripping.  This wasn’t so bad…no contractions.  A few hours later…no contractions.  Either I have pain tolerance of a greek goddess or this stuff ain’t working.  Note: When issued pitocin, it is a slow drip that they increase every 15 minutes.  3AM rolls around and I am in extreme pain…Holy contractions!  Dear Lord, please get me an epidural.  The kind nurse squirted miracle juice into my IV and I started flying!  Whew…this is some good shit!  45 minutes later, the anesthesiologist was in my room issuing me an epidural.

Epidural – scariest thing in the world…have you seen the needle that jam into your back?  Again…I’m going to die.  Yeah…didn’t feel the epidural, at all!  I love you Mr. Anesthesiologist!  And I love you Ms. Nurse that gave me the miracle drug to mask those incredibly painful contractions.  I was numb to the world from the waist down.  I was happy…well, sorta!

8AM I was dilated to 4 cm!  Come on come on…longest night of my life!  I was told that I was now in active labor and should dilate a cm per hour.  What a long night and it was about to turn into a long day.  UGH!  2 hours later, to my surprise, I was fully dilated to 10 cm and told that it was time to push!

Okay…so pushing a baby out of your “you know what!”  No body tells you that the epidural is really only good for those contractions.  You WILL feel the baby come out with every push…and let’s just say, it doesn’t feel good!  It hurts like a… “Most first time moms will push anywhere between 2-3 hours.  We will call the Dr. once we get close.  I need you to push through your butt.  3 pushes per contraction, each 10 seconds,” the nurse instructed!  Whoa whoa whoa…back up.  2-3 hours of painful pushing?  Kill me now!

…and here’s another contraction and PUSH.  1, 2, 3, 4, 5, 6, 7, 8, 9, 10….and PUSH!  “Hubs check out this head.  Your baby has a full head of hair and it’s curly.”  OMG!  …and push!  Baby’s head is crowing!  “Ummm Dr. V you may want to get here and fast.  This chick is really pushing and the baby is almost here.”  A little under an hour and Miss Brooke Victoria Olds was born.  12:33PM weighing 7lbs, 8oz and measuring 20.75 inches long.  Baby is healthy, except that she decided to go #2 in my stomach…mmm mechonium!

Baby was placed on my chest and stared at me with the biggest blue eyes!  She smirked a little smile!  Wow, she is beautiful.  OMG, this is my baby!  It took a while for this concept to hit me.  Holy macaroni, I am a Mommy!  This has been my dream ever since I was a little girl…and I was in love.

Looking back on labor, I remember the contractions and I remember the pushing.  None of which I understood until I was in the delivery room experiencing it first hand.  It was really hard…probably one of the hardest things I have ever done.  But so worth it and such an amazing experience!  I can’t believe it’s been 2 weeks.  My baby girl is growing way to fast!  The other night my husband and I bathed her and got ready to put her sleeper on.  To our surprise, the smaller new born sleeper no longer fit her.  I cried!  I’m not ready for this…she is growing to fast!  Oh it is just starting.  I can’t wait to experience all stages of life with this little angel…even if that means she is growing up before our eyes, way to fast!

We are blessed!

Screen Shot 2013-08-09 at 3.30.46 PM

Another Renovation: Brooke’s Bathroom

One more item to check off the list before Miss Brooke’s arrival; the Jack and Jill bathroom…aka the kid bathroom.  This bathroom hangs off of Brooke’s nursery and our current workout room (future nursery #2).  Similar to other bathrooms in the house, I am ashamed to say that we do not have “before” pictures of this bathroom…totally my fault!

Decorating this bathroom was not a requirement before the baby arrives, however, it is really REALLY hard not to get totally carried away when getting ready for a little girl.  Once you get started, it is pretty difficult to stop.  Good thing the bathroom took way less time than the actual nursery.

A Few Bathroom Renovations to Share:
  • Painted walls
  • New cabinet doors
  • New hardware
  • New lights
  • New bathtub
  • Tiled bathtub walls
  • Added slate to bathroom floors
  • New mirrors over sinks
  • Added granite countertops to sinks

Enjoy!

Fun Fact: The white frame on the wall was a decoration from my baby shower that I incorporated into Brooke’s bathroom.  Super special…thank you Carolyn and Meghan!

DSC_1016 DSC_1018 DSC_1019 DSC_1020 DSC_1022 DSC_1023 DSC_1024 DSC_1025

Basket Labels and Brooke’s Closet

So I have been in this “nesting” phase where everything must be super clean, organized and DONE!  It is this overwhelming feeling that the baby may come early and you are not prepared and she has nothing to wear and the bedding isn’t washed and…. *deep breaths* and LOTS of crushed ice…it’s the “crazy” talking!  But seriously, I have this weird addiction to crushed ice and it makes everything better…CRAY CRAY!

Anyways, I took a drive down to the Pottery Barn Outlet in SC and picked up some super cute little baskets that I planned to incorporate in cube book shelves I picked up from Ikea…until I got home and the baskets didn’t fit into the cube book shelves!  I should have measured…waaa waaa!  O’well, time to get a little creative.

I see so many fun ideas with mini chalk boards so I decided to incorporate this with my baskets.  Super easy, super fast and super cute!

Materials
(materials are from AC Moore)
  • Mini Chalk Board
  • Chalk
  • Cute Ribbon
  • Hot Glue Gun
  • Scissors
  • Basket (Pottery Barn)

DSC_1006 DSC_1007 DSC_1004

Using a hot glue gun, hang the mini chalk board on the handle of the basket.
DSC_1008
Make a mini bow and hot glue on the chalk board for decoration.
DSC_1009
Write desired word or phrase on the chalk board.
DSC_1010
easiest.project.ever.
DSC_1011
I sat my baskets on a shelf in the closet for easy access to Brooke’s little things.  I ended up using the Ikea book shelves in her closet for extra storage.  Lastly, I ordered little size dividers for all of Brooke’s clothes.  These little gems can be found on Etsy (link HERE).
DSC_1013
DSC_1012
DSC_1015 DSC_1014
Super organized and all set for our sweet little bundle of joy!

B is for Brooke: The Nursery!

Starting with a room from scratch is like looking at a blank canvas and wondering what in the world will I paint today…it can be overwhelming.  So off to Pinterest I go for a little inspiration.  When I started the nursery, there were a few things that I knew I didn’t want to do…you will laugh when I list these out!

My “will not do” list:

  • Use pink in the nursery (yup…did that)
  • Have a specific theme in the room (yup…did that)
  • Use a large sticker decal on the wall (totally did this)

What can I say…never say never!

I found this little gem on Pinterest that I fell absolutely in love with.  This picture ended up becoming my inspiration for the room.

Nursery Inspiration

I loved the gray walls with pink accents.  I loved the pewter wrought iron crib and I was obsessed with the concept of contrasting furniture to provide depth in the room.  First line of business…finding the perfect “gray” to paint the walls.

Yeah…why the hell is it so difficult to choose a gray paint color?  The book was not even kidding, “50 Shades of Gray.”  But…it is more like a million shades of gray!  This was frustrating…but…thanks to a few Facebook friends that had been down this path before, I was able to cheat a little.  We went with Sherwin Williams “pussywillow”…who comes up with these totally inappropriate names?  Anyways…

Next step was purchasing the furniture.  I started with the usual…Pottery Barn kids and quickly realized that going down this path would drain our 401 k…not the best option when it comes to $$$$.  I have a deep love for refurbished antiques, so off shopping with mom I went.  I love taking my mom shopping with me because she keeps me grounded and let’s be honest…she is the REALLY creative one!  I get a lot of ideas from her!  Love you mom!  We stumbled across this quirky, yet fabulous antique shop in Chapel Hill…accidentally!  Someone told my mom that this place had a consignment wrought iron crib (NOT ANTIQUE) and we decided to go and check it out.  I did not expect to find beautifully refinished 1930’s chalk white dressers…I fell in love!  Not only was it love at first sight being antiques and all, but both dressers were the price of one at the Pottery Barn kids!  SCORE!  Next, the crib!  I really really really wanted wrought iron but dang, why are they so pricey?  To be honest, all cribs are pricey when purchasing new…but…there is that expensive taste that can get me into trouble.  I searched and searched on craigslist, ebay, EVERYWHERE on the internet and then BAM…there it was.  Restoration Hardware had a pewter crib on clearance and was running an additional 10% off deal.  It’s like the Heavens opened up and angels were singing!  Looking for a pewter crib was challenging, however, this was super important to me because if the next kiddo is a boy, I could make pewter boyish!  AND…the coolest and most surprising thing… check out that inspiration picture I posted from Pinterest above…this the the SAME EXACT CRIB!  What what!!!  Lastly, the glider!  Similar to the crib, I went gray for the sole purpose of reusing if the next kid is a boy.   We bought the glider 30% off from Green Pea Baby in Cary, NC.

So we have lots of gray and accent white furniture…time for a little bit of Pink!  Curtains!!  Okay…never expected pink curtains to be as challenging to find as they were.  I shopped EVERYWHERE!  Most places only carry 84″ length and I really wanted needed 95″.  I was lost and almost resorted to ridiculously expensive Pottery Barn kids curtains…and then…I found Hong Kong on Etsy.  That’s right…Hong Kong!  Custom made pink taffeta blackout curtains all the way on the other side of the world and for way less money!  Curtains were made, shipped and arrived at my house in a week and a half!  So cool!  I ordered a few yards of extra pink taffeta to make my custom crib bedding.  More on the crib bedding here.

Butterflies!!!  Who doesn’t love a pretty butterfly…if you don’t then you are obviously dead inside…LOL jk!  I found a large rusting butterfly at the Raleigh flea market and behold…the butterfly wall was born!  Also, I wanted to incorporate worn ballet slippers in the butterfly collage!  A generous friend, who happens to be an incredible ballerina, gave me these beautiful slippers for the nursery wall!  They are perfect!  Thank you Bethany…you rock girlfriend!

Old windows…yup the window over the dresser totally came out of a dumpster…not ashamed!

The focal…cherry blossom branches!  I really didn’t want to do another sticker wall but my original idea for vintage fashionista art was to expensive and impossible to find.  So I consulted with my mom, always, and she gave me the brilliant idea to do some sort of tree mural behind the crib.  It’s safe for a baby and easy to remove when she no longer wants this in her room…what a great idea!  So I consulted with China, again, and ordered my sticker decals from Etsy.  Every.single.flower.sticker.at.a.time…yup, that took a long time!

I am so incredibly excited to announce that our little peanut’s nursery is complete!  I have been dying to share but couldn’t let myself do it until stickers and wall hangings were on the wall!  Enjoy!

DSC_0988

DSC_1000 DSC_0994

DSC_1002 DSC_0992

DSC_0993 DSC_0990

Candles, a Garden and Strawberries

This past weekend was quit busy for us.  The month of May is always pure madness because we have three birthdays (including my own) and Mother’s Day.  Given that my brothers were in town, we decided to cram every May occasion into one weekend!

This is the first year I had the pleasure of celebrating Mother’s Day since I am a Mother to Be!  A girl has got to take advantage of this opportunity…obviously!  But seriously, it was super special and I got to spend a lot of time with special people!

Saturday we celebrated Mother’s Day with my side of the family, my Dad’s Birthday, my Mom’s Birthday and my brother’s surprised me with a little celebration for my Birthday!  The celebration took place at my house!  Super fun!  I love entertaining and I wanted to share a few treasures from the wonderful evening.

Who doesn’t love being greeted at the front door with a fresh pot of mixed and colorful annual flowers?  What is even better than a fresh pot of flowers?  Candles in a mixed pot of flowers.  I found this simple idea on Pinterest (I am sure you could have guessed this).   Inexpensive materials for this simple detail:

  • An old wine or martini glass
  • A cheap candle (you can find at the dollar store)
DSC_0933

Simply break off the base of the old wine or martini glass and stick into your pot of flowers.  Set the candle in the old wine or martini glass.  Light candle.  BOOM…candles in your Garden.  So elegant, simple and inviting on a cool summers day.  Your guests are guaranteed to steal your idea 🙂

DSC_0932
DSC_0931
DSC_0930

On a totally separate note, I served homemade, made-from-scratch strawberry shortcake for dessert.  What is light and screams summer?  Strawberry shortcake.  Perfect for Mother’s Day, Birthdays or even an afternoon party for no reason.  Here is the recipe I found that is SUPER easy and guaranteed to be a hit wherever and whenever you are looking for a light and summery dessert!  Enjoy!

Bassinet Bedding for Less

Sewing, sewing, sewing…I am officially sick of sewing!  Although, I thoroughly enjoyed every minute of it, I am SO GLAD to be done.  Before tackling the crib bedding, I decided to make my own bassinet bedding.  Just like the crib bedding, I fell in love with the world’s most expensive bassinet bedding which drove me to sewing my own.  Can we say NESTING!!!!  Yup, it may be a bit early for me, but I think I am fully nesting.  It never stops!  Just ask my husband…he is convinced that his wife has gone insane!

Since planning for a little girl is, frankly, an obsession, it was quickly determined that the “Moses Basket” bassinet look was a must!  But ouch, it sure drains your pocket within one “add to cart” click!  I particularly liked Pottery Barn Kids and Restoration Hardware Moses baskets which retail anywhere between $450 – $550.  This seemed a bit out of control and I felt guilty adding to a baby registry, especially since there are so many expensive items that are a bit more important than a fabulously beautiful Moses bassinet.

So what is a girl to do when there is a strong desire for fabulous but to embarrassed to add to a baby registry?  Go used…yup, I love me some consignment or used baby items!  A very generous neighbor was looking to sell their gently used Pottery Barn bassinet for $100, including the bedding!  SCORE and exactly what I was looking for.  I simply washed the bumper set and recovered with the fabric I wanted (same as the crib bedding).  Then, the bassinet skirt.  A bit of “ruffle hell,” however, I got through it and am so excited with the final result!  Ta-da!!!  Enjoy!
DSC_0923 DSC_0925 DSC_0922